Bayeux Tapestry
The Bayeux Tapestry is an incredible treasure trove of history of the events of the Norman invasion of England in 1066. It consists of one long strip of linen, 230 ft long and 20 in. wide, embroidered with color images divided into scenes, each describing a particular event. The scenes are joined into a linear sequence allowing the viewer to read the entire story starting with the first scene and progressing to the last.
Harold of England was the last of the Anglo-Saxon kings, reigning only for nine months after the death of King Edward. By 1066, England was facing invasion from both the Norwegian forces of King Harold of Norway to the North and the Norman threat from the South. On September 25th, Harold defeated the Norwegian forces at Stamford Bridge near York, and quickly lead his army South to fight Duke William.
The armies would meet at Hastings in Southern England; William’s Norman cavalry and spearmen were able to overcome the ranks of English axemen in a decisive victory, and Harold was killed. After the battle, William moved quickly towards London, and was crowned King of England at Westminster Abbey on Christmas Day, 1066.
The Tapestry itself was created well after the events by Normans, who had not likely witnessed the battle, and gives little idea of the horror and confusion of the fighting. It is believed that the Tapestry was commissioned by Bishop Odo, bishop of Bayeux and the half-brother of William the Conqueror. The Tapestry's images told the illiterate masses of the story of the conquest of England from the Norman perspective, and is still the most important visual source for the Battle of Hastings.
William based his claim to the English throne on the promise he declared he obtained from Harold while Harold was in Normandy in the days of Edward the Confessor. The famous Bayeux Tapestry shows Harold taking the oath to support William. One cannot be sure of this incident because the tapestry, which was made by Norman artisans, doubtless presents William's claim in a strong way.
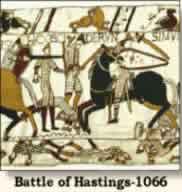
This is one of many scenes depicting the ferocity of the battle. Wielding his battle-axe, a Saxon deals a death-blow to the horse of a Norman. This was the first time the Normans had encountered an enemy armed with the battle-axe. For the Saxons, this was the first time they had battled an enemy mounted on horseback. This scene probably describes the later stages of the battle when the Norman knights had broken through the Saxon shield wall. At the bottom of the scene lay the dead bodies of both Normans and Saxons.
The Death of Harold
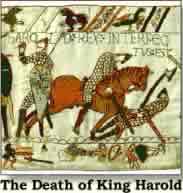
King Harold tries to pull an arrow from his right eye. Several arrows are lodged in his shield showing he was in the thick of the battle. To the right, a Norman knight cuts down the wounded king assuring his death. At the bottom of the scene the victorious Normans claim the spoils of war as they strip the chain mail from bodies while collecting shields and swords from the dead. Scholars debate the meaning of this scene, some saying that the man slain by the knight is not Harold, others contesting that the man with the arrow wound is not Harold, others claiming that both represent Harold. The Latin inscription reads "Here King Harold was killed." The Tapestry ends its story after the death of Harold.
During the Middle Ages, tapestries were a popular art form. Many of the castles of Europe used tapestries not only as a decoration but as a practical measure to help cover the stone walls and keep out the cold. The tapestry scenes often included horses. Perhaps one of the best known is the Bayeux Tapestry, thought by some to have been designed by Queen Matilda to honor the success of her husband, William the Conqueror, when he invaded England in 1066. Two hundred horses are embroidered into this work of art.
It can be seen from the tapestry that both the English and Normans carried painted shields and standards, but these were not yet exclusive to individuals. Accounts from the battle relate of a rumor that Duke William had been killed and the rumor was not discredited until William removed his helmet to show himself: his shield was not a recognizable device.
References
- ^ Swyrich, Archive materials